Wednesday, October 31, 2012

Mini Halloween Pumpkin Cupcakes!

Happy Halloween morning!!

I love seeing what everyone dresses up as every year, and I also love to see all the different ways people use pumpkin flavoring! Pinterest is overflowing with pumpkin!

For my part, I opted for mini cupcakes. I love small serving sizes, because you can have a taste of something decadent, but you don't need finish a large serving. And if you want more, have another! At only 50 calories a pop, these delicious little cakes will satisfy your pumpkin craving without crashing your diet!


Here's The Skinny:

Each cupcake has about 50 calories! Sweet!  

 Recipe:

Makes about 40 cupcakes

For the cupcakes:

1 1/2 cups canned 100 percent pure pumpkin
2 cups vanilla cake mix (I recommend French vanilla)
1 1/2 cups nonfat milk, at room temperature
1/4 cup vegetable oil or coconut oil
2 eggs, at room temperature
2 teaspoons pumpkin pie spice

For the frosting:

1/2 cup powdered sugar
1/4 cup 1/3 less fat cream cheese, at room termperature
1/4 (2 tablespoons) unsalted butter, at room temperature
2 tablespoons low fat sour cream

Preheat oven to 350, and line a mini muffin tin with liners.

In a large bowl, combine all of the ingredients for the cupcakes and mix together with a hand mixer, until the batter is smooth. Mix on high speed for a minute or two at the end, to make the batter light and fluffy. Spoon about a tablespoon of batter into each liner, or use a cookie scoop. Depending on the size of your tin, you may need to make several batches.

Bake for about 15 minutes, or until the cupcakes are light and golden, and bounce back if you touch the top.

Let the cupcakes cool for at least 30 minutes before frosting them, to ensure they won't break apart.

The frosting is just as easy as the cupcakes to assemble! Just throw everything into a bowl, and mix on high with a hand mixer, until fluffy. Then use a small knife, and spread on top of the cooled cupcakes.

Decorate with sprinkles, and enjoy!

We used these as a birthday cake to celebrate Heather's birthday last weekend. So cute!


Happy Halloween everyone! Stay warm, stay safe, and have a fun and spooky day!!!


Monday, October 15, 2012

Deep Dish Chocolate Chip Cookie

Here's a recipe that is in no way healthy, in no way "skinnified", but is tasty, easy, and fast! Definitely not a bad thing to have in your arsenal if a cookie craving hits suddenly! And the other good news is that it makes one serving so you won't be tempted to eat three cookies in one go. That's my only justification for publishing this recipe on my blog! Honestly, this is a pretty big serving for one person, and next time I might cut the recipe in half.


Link to original recipe: http://www.number-2-pencil.com/2012/03/chocolate-chip-cookie-in-cup.html

Here's The (Not So) Skinny: 475 calories for the whole recipe

1 Tbsp butter, melted
1 Tbsp white sugar
1 Tbsp brown sugar
1 egg yolk
3 drops vanilla
Scant 1/4 cup flour
Pinch of salt
2 Tbsp semi sweet chocolate chips

1) In a ramekin or mug, mix together the melted butter, sugars, vanilla, and egg yolk
2) Add the flour and salt, and mix to combine
3) Add the chocolate chips
4) Microwave for 40-60 seconds, or until the cookie looks done

Enjoy! 


Friday, September 28, 2012

Vegetarian Mexican Quiona and Bean Pilaf!

Last night I was craving Mexican food in a major way, but really couldn't justify all of that heavy, greasy food. So I lightened it up, while keeping all the flavors of the Mexican food I love! This dish is vegetarian, but add some ground beef or grilled chicken if you want!


This recipe uses quinoa, which has gotten a lot of press lately. It's similar to rice, but it's actually a seed that sprouts when you cook it. What makes quinoa amazing is that it's not only tasty, it also has more protein than any other grain! It actually provides all 9 essential amino acids, making it a complete protein unlike similar foods like rice. That's why nutritionists consider it a super food! Quinoa is also gluten free, so this dish is pretty safe to serve to anyone. (Just check your friends' dairy preferences before adding the cheese).

Here's The Skinny: Each serving has only 400 calories!

Recipe:

(Serves 4)

2 tablespoons olive oil
2 bell peppers, 1 yellow and 1 red, cut into about 1/2 inch pieces
2 scallions, whites and greens divided
1 white onion, diced
2 stalks celery
3 cloves garlic, minced
1 jalapeno, seeds and ribs discarded unless you want it spicy!
2 tablespoons tomato paste
1 cup quinoa
2 15-oz cans black beans, drained
1/2 tsp salt
1/2 tsp black pepper
1/2 tsp cayenne
2 tomatoes, diced, seeds discarded
4 cups baby spinach
1/2 cup chopped cilantro
1/4 cup grated pepper jack cheese


1) Heat olive oil in a large skillet over medium-high heat, and add the peppers, scallions whites, onion, and celery. Cook until softened, about 5 minutes.
2) Add the garlic, jalapeno, and tomato paste. Cook for a few minutes, or until the tomato paste turns a deep red color.
3) Add the quinoa, black beans, salt, pepper, cayenne, and 2 cups of water. Bring to a simmer, and cook until the quinoa has absorbed the water, about 15 minutes. You may need to add more water, depending on if the quinoa has all sprouted.
4) Once most of the water is absorbed, remove the skillet from the heat. Stir in the tomatoes, baby spinach, cilantro, half of the cheese, and half of the scallion greens, until the spinach has wilted.
5) Split between 4 plates, and sprinkle with the remaining scallions and cheese.

Enjoy!


Almond Bread

Ok guys, after a long time away, I'm back!

Although I haven't been posting, I have still been busy in the kitchen! Also check out the upcoming recipes Sesame Quinoa Spring Rolls and Mexican Bean and Quinoa Pilaf!

But, for now, we're going to start with the most important part of the meal: dessert!

My friend Clare came over for dinner, and I wanted to put together a dessert for her, but didn't have the time to do anything extravagant. This took me only about 10 minutes of hands-on time, and I got a huge pay-off! Clare said it was one of her top three favorite breads/cakes, and said it may even be #1! Sweet!

I got this recipe from the magazine Cooking Light, and I'm so glad I gave it a go! It's incredible, and closely resembles a pound cake where almond paste replaces the butter that normal pound cakes have. I plan to replace the all purpose flour with oat flour to make it gluten free, and in the future I'd love to try some almond flour just to bring it to the next flavor level! I'm also interested to try almond milk to replace the nonfat milk!

Here's The Skinny:

Each slice (Recipe makes 16 slices): 195 calories. Compare that to your favorite 500 calorie sweet bread from Starbucks! Yeah, go ahead, have another piece!


 Recipe:

1 1/2 cups flour
1 1/2 teaspoons baking powder
1/2 teaspoon salt
2/3 cup granulated sugar
2 tablespoons butter
2 tablespoons coconut oil
1 (7 oz) package almond paste (easily found in the baking section of your grocery store)
2 large eggs
1/2 teaspoon vanilla extract
1/2 cup plus 1 tablespoon nonfat milk, divided
1/4 cup sliced almonds
1/3 cup powdered sugar
Dash of salt


1)Preheat oven to 350
2) Whisk together flour, baking powder, and salt in a bowl; set aside.
3) In a large bowl or a stand mixer, combine sugar, butter, coconut oil and almond paste until well combined.
4) Add eggs one at a time, beating well after each addition. Then beat in the vanilla.
5) Add flour mixture and 1/2 cup milk alternately to butter mixture, beginning and ending with flour mixture; beat just until combined.
6) Scrape batter into a greased 9 x 5-inch loaf pan, and then sprinkle with almonds.
7) Bake at 350 for 50 minutes, or until a toothpick comes out with moist crumbs. Cool in the pan for at least 10 minutes, and then remove to a wire rack to cool completely.
8) Whisk together the remaining 1 tablespoon milk and 1/3 cup powdered sugar and the dash of salt. Drizzle the glaze over the almonds and let stand until set.

Enjoy!

Wednesday, September 5, 2012

Faux Fried Rice With Tofu

I have to admit, some days it takes every ounce of self restraint I have to not give in to the temptation of Panda Express. I'm not alone, right? You're hungry, the smooshed PB&J sandwich at the bottom of your bag isn't exactly calling your name, and then the smell of delicious fried rice comes wafting your way. It wouldn't hurt to just get a little, right? And maybe a little bit of an entree? Just a little? Or...now that I'm looking at it...a medium size wouldn't be soooooo bad...

No! Stop! Panda Express fried rice is a whomping 530 calories per serving, with 16 grams of fat! Ouch! And that eggplant and tofu entree that sounds so healthy? 310 calories with 24 grams of fat! Are you kidding me?? Before you know it, you've consumed 740 calories! Now, I'm not one to say that you can't eat "bad for you stuff", and of course I eat it from time to time. Pretty much everyone who knows me is aware of my intense love of chocolate. So sue me! But why would you eat from Panda Express (or your equivalent) when it's totally unnecessary?

Behold, my faux fried rice with tofu recipe. SO easy, SO tasty, SO good for you!


Here's The Skinny:

355 calories per serving, 15.2 grams of protein, 5.2 grams of fiber, and 4.4 grams of fat.

Compare that to 40 grams of fat from Panda! I feel silly for ever having eaten there at all!

Recipe:

Makes two servings

1/2 of a 15 oz package of tofu
1/2 cup jasmine rice
1/2 cup chopped carrots
1/2 cup eggplant
3/4 cup peas

Cut the tofu into about 1 inch squares, and set into a shallow bowl. Pour marinade (recipe follows) over the tofu, and let sit a minimum of 30 minutes, but the longer the better. I try to marinate mine overnight.


Steam or boil the vegetables according to your preferences, and set aside.

Remove tofu from marinade, and lay out on a baking sheet. Broil the tofu for about 20-25 minutes, or until the tofu is cooked and brown. Reserve the remaining marinade.

While the tofu cooks, boil the rice according to manufacturer's instructions, and set aside.


Combine the tofu, rice, and vegetables, and split onto two plates. Before serving, drizzle one tablespoon of the marinade onto each plate.

Marinade Recipe:

1/4 cup reduced sodium soy sauce
2.5 Tbs rice vinegar
1 Tbs garlic chilli sauce 
 
Dig in! All the flavor, none of the guilt!

I love to save half of this for lunch the next day. Just remember to save the marinade until just before you plan to eat it, since you don't want to rice to get soggy.
 
Note: This recipe is pretty obviously gluten free and vegan

Vegan, Gluten Free Cranberry and Dark Chocolate Chunk Oatmeal Cookies

It's hard to even fit all of the mouthwatering details into the title of this blog post!

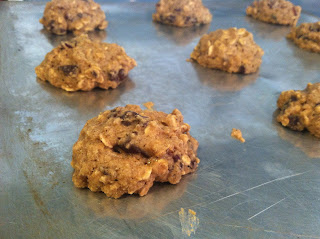
You all heard about the success of my oatmeal raisin cookies, so I decided to try out a new variation with dark chocolate and cranberries replacing the raisins. Not an earth shattering shift in my recipe, I know, but holy cow does it have a huge payoff! And the best news? It doesn't even change the calories! Still only 70 calories per cookie. I added a bit more cinnamon to this version too :)

Ladies and gentlemen, start preheating those ovens!


Here's The Skinny:

Per cookie: 70 calories, 1.7 grams protein, 1.3 grams fiber, 1.5 grams total fat, 6 grams of sugar, and all of those good-for-you antioxidants from the dark chocolate! Can I get a "hell yeah!"

Recipe:

Makes 24 cookies

1 1/2 cups oat flour
1/2 cup raw sugar
1/2 teaspoon baking soda
1/2 teaspoon baking powder
1/2 teaspoon salt
3/4 teaspoon cinnamon
3/4 cups rolled oats

1/3 cup original almond milk
1 teaspoon vanilla extract
1/2 cup applesauce
1 teaspoon coconut oil
1/4 cup dried cranberries
3 squares of Ghiradelli 60% cacao chocolate bar

Preheat the oven to 350. In a large bowl, combine the flour, sugar, baking soda, baking powder, salt, and cinnamon.


Using a serrated knife, chop the squares of chocolate into small pieces and set aside.

Add the milk, vanilla extract and coconut oil to the flour mixture, and stir until just combined. Add the dried cranberries and chocolate chunks.


Arrange balls of dough on two cookie sheets, 12 per sheet. With a spoon, flatten the balls gently. Bake them in the oven for about 8-10 minutes. Be sure not to over bake these! Err on the side of caution. Since these don't have any any animal products in them, being slightly undercooked won't be a problem!

Last but no least: enjoy! 


Monday, September 3, 2012

Vegan Raisin Bran Muffins

The first day of fall is upon us! Kids are going back to school and life getting back to its usual speed; I find it so easy on busy mornings to run out of time for breakfast, which l know wrecks havoc on my metabolism, and makes me ravenous and more likely to crave something unhealthy for lunch.

The solution? Try these easy, fast, healthy and yummy muffins for a perfect breakfast for people on the go! I'm a big fan of bran muffins! They're healthy, and full of fiber that keeps me full all morning! 

Make these tonight and be ready to go tomorrow morning!


You can store these in freezer if you don't want to eat them all in one go.  Just pull one out in the morning on your way out the door. By the time you get to work, it should be defrosted and ready to enjoy!

I love these as is, but I'm a compulsive experimenter, so here are some of my ideas for future batches. Instead of using applesauce, I'm thinking about trying pureed prunes for even more fiber. I'm also considering adding half a banana or maybe some cooked apple for some extra flavor. Experiment at home and let me know what you think!

Here's The Skinny:

Per muffin: 160 calories, 6 grams of fiber, 4 grams of protein

Recipe:

Makes 10 muffins

1 1/4 cups whole wheat flour
1/4 cup lightly packed brown sugar
1/4 tsp salt
1 Tbs baking powder
1/2 tsp ground cinnamon
2 cups all-bran cereal
1 1/4 cups original almond milk
2 Tbs coconut oil
1/4 cup apple sauce
1 tsp vanilla extract
1/2 cup raisins

1) Preheat the oven to 400, and line 10 cups of a muffin tin with liners.
 
2) Combine the cereal and almond milk, and let sit until the bran becomes soft and mushy, about 5 minutes.

3) While the cereal sits, whisk together the flour, sugar, salt, baking powder, and cinnamon.

4) Add the coconut oil, apple sauce, and vanilla extract to the soaked bran, and beat with a hand mixer until combined. Then stir in the flour mixture until just combined. Lastly, stir in the raisins!

5) Using an ice cream scoop, distribute the muffin dough into 10 lined muffin cups.

6) Pop into the oven for 20 minutes, rotating halfway through so they cook evenly.

Note: The muffins will come out of the oven is basically the exact same shape as they are when they go in, so you may want to smooth the tops before baking

I love these with a little bit of fruit preserves (not included in calorie count). Yum!

Enjoy the beginning of fall! It's my favorite season, and some of my favorite flavors - stay tuned for pumpkin recipes to come!


Saturday, September 1, 2012

Gluten Free and Vegan Chocolate Cake with Cocoa Peanut Butter Sauce

Wow. Just wow. There are no other words ... I'm a chocolate fanatic, and this recipe totally satisfied my cocoa cravings!

This is another adaptation of a Bethenny Frankel recipe, and she has not led us astray! So crazy delicious!

Here's The Skinny:

Each generous slice (serves 6) has 417 calories, 6.1 grams fiber, and 10.4 grams protein! Pretty dang good for a piece of chocolate cake if you ask me!

Recipe:

For the cake:

1 1/4 cups oat flour
1 cup raw sugar
1/3 cup unsweetened dark cocoa powder
1 teaspoon baking powder
1/2 teaspoon salt
1 cup water
1 teaspoon warm water
1 teaspoon vanilla extract
2 tablespoons coconut oil
1 teaspoon apple cider vinegar

1) Preheat oven to 350
2) Combine all the ingredients in a large bowl, and stir until combined.
3) Pour into a bread pan, and bake for 40 minutes, rotating the pan halfway through.


For the cocoa peanut butter sauce:

1/3 cup raw sugar
1 1/2 tablespoons coconut oil
2 1/2  tablespoons creamy peanut butter
2 tablespoons unsweetened cocoa powder
2 tablespoons original almond milk
2 teaspoons vanilla extract

Combine ingredients in a small saucepan, and heat until the crystals from the raw sugar are dissolved. Then drizzle over the chocolate cake for an incredible experience!

This recipe is a MAJOR keeper! SO SO delicious, and not a bad calorie count for the size of the piece of cake! You could easily cut the cake into 8 and still have a good serving size!

Next time, I'm planning to bake the cake in ramekins instead of in a bread pan, because the cake was pretty crumbly and hard to get out of the pan and serve. I think serving this cake in ramekins with the sauce over top would be perfect!